
Singer Simple Sewing Machine Manual: A Comprehensive Guide
This manual details the basic operation and safety instructions for your sewing machine. It’s crucial to read all instructions before use, ensuring proper functionality and longevity of the machine.
The Singer Simple sewing machine is designed for ease of use, making it an excellent choice for beginners and those seeking a straightforward sewing experience. This machine complies with IEC/EN 60335-2-28 and UL1594 standards, ensuring a level of safety and quality. Before operation, thoroughly reviewing the owner’s manual is paramount to understanding its features and capabilities.
This machine is a household sewing machine intended for basic sewing tasks. It’s important to familiarize yourself with all instructions and safety precautions detailed within this guide. Proper understanding will not only enhance your sewing projects but also contribute to the machine’s durability. Always keep the manual accessible for future reference, especially regarding safety instructions. Testing the machine yourself, if possible, is recommended to develop familiarity.
The Singer Simple aims to provide a reliable and uncomplicated sewing solution, and this manual serves as your primary resource for maximizing its potential.
Understanding the Machine Components
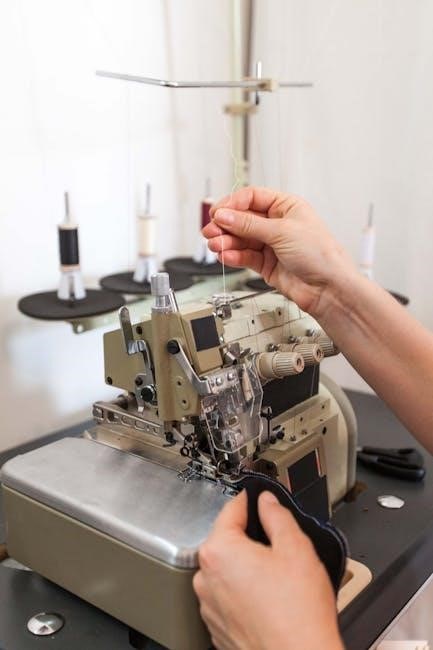
The Singer Simple sewing machine comprises several key components essential for operation. These include the power switch, handwheel, stitch length dial, stitch width dial, reverse lever, needle clamp, presser foot, and presser foot lever. Understanding each part’s function is crucial for effective sewing.
The machine also features a bobbin winder, bobbin case, and thread tension dial, all contributing to proper stitch formation. Familiarize yourself with the location of each component as detailed in the manual. The needle, a vital part, requires careful handling and periodic changes. The basic design prioritizes accessibility, making component identification straightforward.
Before beginning any sewing project, ensure all components are correctly installed and functioning. Refer to the diagrams within this manual for visual guidance. Proper component understanding is fundamental to safe and efficient machine operation, and will help avoid potential issues.
Threading the Singer Simple
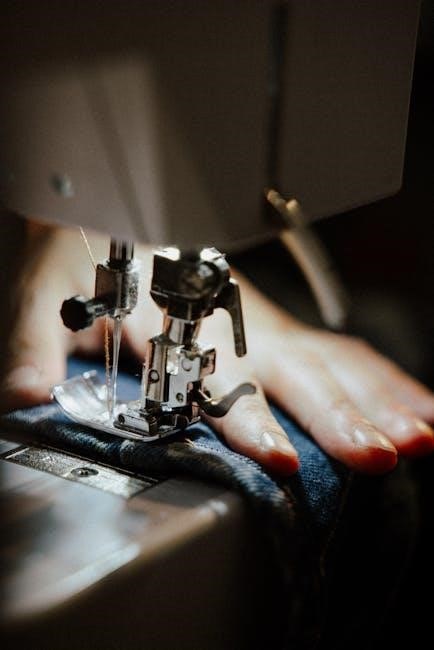
Threading the Singer Simple requires following a specific sequence to ensure proper stitch formation. Begin by raising the presser foot and ensuring the needle is in its highest position. Guide the thread from the spool pin, through the first thread guide, and then down to the tension disc.
Next, thread the take-up lever, ensuring the thread is securely seated. Continue threading through the second thread guide and finally, thread the needle from front to back. This process, detailed in the manual, is critical for consistent sewing. Always double-check that the thread is correctly positioned in each guide.
Incorrect threading can lead to skipped stitches or thread breakage. Refer to the diagrams provided in this manual for a visual guide. Practice this basic skill until it becomes second nature, ensuring smooth and reliable operation of your sewing machine.
Winding the Bobbin

Winding the bobbin on your Singer Simple is a straightforward process, essential for consistent sewing. First, place the spool of thread onto the spool pin. Then, guide the thread through the designated thread guides leading to the bobbin winder. Securely attach the empty bobbin to the bobbin winder spindle.
Engage the bobbin winder by pushing it to the right. Press the foot pedal gently to start the winding process. Allow the bobbin to fill evenly, stopping when it’s nearly full to prevent overflow. Disengage the bobbin winder and remove the filled bobbin.
Consult your manual for specific diagrams illustrating this procedure. Proper bobbin winding is crucial for achieving balanced stitches. Always use the correct type of bobbin recommended for your Singer Simple to avoid damage or malfunction. This basic skill ensures a smooth sewing experience.
Basic Sewing Techniques
Mastering basic sewing techniques with your Singer Simple unlocks a world of creative possibilities. Begin by practicing straight lines on scrap fabric, maintaining a consistent speed and guiding the fabric gently. Ensure the presser foot is down for optimal stitch formation.
Next, explore zigzag stitching, useful for finishing raw edges and creating decorative effects. Adjust the stitch width according to your project needs, referencing the manual for guidance. Remember to backstitch at the beginning and end of each seam to secure the stitches.

These basic techniques form the foundation for more complex projects. Consistent practice is key to developing accuracy and control. Always prioritize safety instructions and refer to the manual for detailed illustrations and troubleshooting tips. Your Singer Simple is designed for ease of use, allowing you to quickly build confidence in your sewing skills.
Straight Stitching
Straight stitching is the most fundamental technique for any sewing machine user, and your Singer Simple excels at it. Begin by selecting the straight stitch setting on the stitch dial, as detailed in your manual. Ensure the fabric is placed under the presser foot, aligned with your desired seam allowance.
Gently guide the fabric, maintaining a consistent speed. Avoid pulling or pushing the fabric, allowing the machine to feed it through. A consistent seam allowance is crucial for accurate results. Practice on scrap fabric to develop a feel for the machine’s rhythm.
Remember to backstitch at the beginning and end of each seam to secure the stitches and prevent unraveling. Refer to the manual for specific guidance on backstitching length. Mastering straight stitching is the first step towards countless sewing projects. Always prioritize safety instructions during operation.
Zigzag Stitching
Zigzag stitching offers versatility beyond simple seams, ideal for finishing raw edges, creating decorative elements, and sewing stretch fabrics. To begin, select the zigzag stitch setting on your Singer Simple, consulting your manual for specific dial positions. Adjust the stitch width to achieve your desired zigzag pattern – wider for more pronounced zigzags, narrower for a closer resemblance to a straight stitch.
Practice on scrap fabric to understand how different width settings affect the stitch appearance. When finishing edges, position the fabric with the raw edge aligned with the oscillating zigzag needle. Ensure consistent fabric guidance for a uniform finish.
Zigzag stitches are also excellent for reinforcing buttonholes and creating appliqué designs. Always refer to the manual’s safety instructions and stitch charts for optimal results. Mastering zigzag stitching expands your sewing capabilities significantly.
Adjusting Stitch Length and Width
Adjusting stitch length and width is fundamental to achieving desired results with your Singer Simple. The stitch length dial controls the distance between individual stitches; shorter lengths create denser, stronger seams, while longer lengths are suitable for basting or gathering. Always test settings on scrap fabric before sewing your project.
The stitch width dial, applicable to zigzag and decorative stitches, determines the breadth of the stitch. Wider widths create bolder patterns, while narrower widths offer more subtle effects. Refer to your manual for specific dial markings and recommended settings for various fabrics and applications.
Incorrect settings can lead to puckering, skipped stitches, or fabric damage. Prioritize careful adjustments and consistent testing. Remember to consult the safety instructions in your manual before making any changes to these settings.
Troubleshooting Common Issues
Even with careful operation, occasional issues may arise with your Singer Simple. This section addresses common problems and offers solutions. If your machine isn’t sewing, ensure it’s properly threaded, the presser foot is down, and the power is on. A jammed bobbin is another frequent cause; carefully remove the bobbin case and clear any tangled threads.
Needle problems, like breakage or bending, often stem from incorrect needle size for the fabric or hitting a pin. Always use the correct needle type and avoid sewing over pins. Thread breakage can indicate improper threading, low thread tension, or a dull needle. Re-thread the machine and replace the needle if necessary.
Consult the manual for detailed diagrams and further troubleshooting steps. If problems persist, seek assistance from a qualified sewing machine technician. Prioritize safety instructions when attempting repairs.

Needle Problems
Needle issues are common, but often easily resolved. A broken needle can occur if you attempt to sew through excessively thick fabric or accidentally hit a pin while sewing. Always use the appropriate needle size and type for your fabric weight – a finer fabric requires a finer needle. Bent needles can cause skipped stitches or fabric puckering.
If the needle continually breaks, check that it’s correctly inserted, with the flat side facing the correct direction as detailed in your manual. A dull needle can also cause problems, leading to difficulty penetrating the fabric and potential thread breakage. Regularly replace your needle, especially after sewing through dense materials.
Always disconnect the power before changing the needle and follow the safety instructions outlined in the manual. Ensure the presser foot is up to allow easy needle removal.
Thread Breakage
Frequent thread breakage is a frustrating issue, but often stems from simple causes. Incorrect threading is a primary culprit; carefully re-thread the machine, ensuring the thread is properly seated in all guides and the tension discs. Verify you’re using the correct type of thread for your fabric and needle size – mismatched combinations can cause breaks.
Insufficient or excessive thread tension can also lead to breakage. Adjust the tension dial incrementally, testing after each adjustment. A dull or bent needle, as previously discussed, contributes to thread snapping. Ensure the bobbin is wound evenly and correctly inserted.
Always use quality thread and inspect it for damage before use. Refer to your manual for specific thread recommendations. Remember to disconnect the power before making any adjustments or repairs.
Changing the Needle
Changing the needle is a straightforward process, essential for maintaining optimal sewing machine performance. Always disconnect the power supply before attempting this. Locate the needle screw on the machine head – it’s typically a small screw. Loosen this screw with the appropriate screwdriver (usually included with your machine).
Gently pull the old needle downwards and slightly forward to remove it. Insert the new needle, ensuring the flat side of the needle shaft faces the back of the machine. Push it up firmly until it’s fully seated. Tighten the needle screw securely, but avoid over-tightening.
Always use the correct needle type and size for your fabric. Refer to your manual for guidance. Discard used needles safely to prevent injury. Regularly replacing the needle, even if not bent, ensures consistent stitch quality.
Cleaning and Maintenance
Regular cleaning and maintenance are vital for the longevity and smooth operation of your Singer Simple sewing machine. Always disconnect the power before cleaning. Use a soft brush or lint remover to clear away dust and fabric scraps from the bobbin area, feed dogs, and around the needle plate.
For deeper cleaning, a small amount of sewing machine oil can be applied to key moving parts, as indicated in your manual. Avoid over-oiling. Wipe down the exterior with a damp cloth. Never use abrasive cleaners or solvents.
Periodically check and clean the bobbin case. Keeping the machine free of lint and debris prevents jams and ensures consistent stitch quality. Following these simple steps will help maintain your machine in optimal condition for years to come.
Safety Instructions
Important safety instructions must be followed when operating your Singer Simple sewing machine. Always disconnect the power supply before threading, changing the needle, or performing any maintenance. Keep fingers away from the needle while the machine is running.
Never operate the machine if the power cord or plug is damaged. This sewing machine is designed to comply with IEC/EN 60335-2-28 and UL1594 standards; ensure it remains in safe working order. Do not use outdoors or in damp environments.
Supervise children closely when they are near the machine. Read all instructions carefully before use and keep the manual readily available. Avoid forcing the fabric; let the machine feed it smoothly. Proper use and adherence to these guidelines will ensure a safe sewing experience.
Understanding the User Manual
The Singer Simple sewing machine manual is your primary resource for operating and maintaining your machine. Before using the sewing machine, carefully read through the entire manual, paying particular attention to the safety instructions and component diagrams.
The manual details each part of the machine, explaining its function and how to use it correctly. It provides step-by-step instructions for threading, winding the bobbin, and performing basic sewing techniques like straight stitching and zigzag stitching.
Information within the manual will help you adjust stitch length and width, troubleshoot common issues, and perform routine cleaning and maintenance. Download and read the owner’s manuals to learn about specific machines; testing machines yourself is also recommended.
Singer Simple vs. Other Models
The Singer Simple is designed for beginners, prioritizing ease of use over advanced features. Compared to other Singer models, it typically offers a more limited stitch selection, focusing on essential stitches like straight stitching and zigzag stitching. More complex Singer machines boast decorative stitches, automatic features, and adjustable presser foot pressure.
While advanced models may offer computerized controls and a wider range of capabilities, the Singer Simple excels in its straightforward operation. It’s a robust, reliable option for basic sewing projects, offering a balance between affordability and functionality.
Users considering other models should evaluate their sewing needs. If intricate designs or frequent alterations are anticipated, a more feature-rich machine might be preferable. However, for simple repairs and beginner projects, the Singer Simple provides an excellent starting point.
Resources for Further Learning
To expand your sewing knowledge beyond this manual, numerous resources are available. Singer’s official website (singer.com) provides additional support, FAQs, and downloadable manuals for various models. Online video tutorials on platforms like YouTube offer visual guidance on threading, basic techniques, and troubleshooting.
Several sewing blogs and forums connect enthusiasts, allowing for shared tips, project ideas, and problem-solving assistance. Local sewing classes, offered at fabric stores or community centers, provide hands-on instruction and personalized feedback. Don’t underestimate the value of exploring online communities dedicated to sewing machines.
Remember to always refer to your Singer Simple’s manual as the primary source of information. These supplementary resources are designed to complement, not replace, the guidance provided within this document. Continuous learning will enhance your sewing skills and unlock the full potential of your machine.